Maintenance
In time some specific drive units may have problems with rubbing or scratching coils, this page explains how you can solve this without too much trouble at home and how to prevent this from happening.
Do you have problems with your AER or Lowther driver? Here you will find tips helping you to cure them...
Make sure that you have a clean work environment. Do not have steel tools or metal dust lying around. Always keep the "force" in mind. The magnet can pull a tool from your hand and into the cone!
Most common problems with Lowther or AER drivers are rubbing coils, for example:
- The diaphragm assembly does not sit square on the magnet and the coil rubs inside the magnet cap.
- The driver could have been jogged in transport or maybe the coil is not quite round. The air gap width of the magnet is less than 1 mm so small misalignments are critical.
- Foreign matter has entered the gap and is causing the cone to rub.
- Your driver may be so old that the foam surround has perished.
- You have purchased a new cone and it needs to be installed.
The first thing you need for servicing an AER or Lowther driver are the following tools:
- An 8 mm spanner (5/16 mm is better for Lowther drivers). Your spanner should be as "thin" as possible. It's also best if you can get a spanner made in bronze, or stainless steel (they're a bit softer though...).
- A roll of aluminum foil tape with an acrylic glue on one side. Nice and stiff and sticky. Just what you need for those iron filings stuck in the air gap.
- A 38 mm (1.5") diameter pipe. Brass or plastic is fine. This is the inside diameter of the drivers former.
- A test CD to generate 20-50 Hz tones (or frequency generator of your choice).
When your new driver arrives, carefully check that that the former is sitting square in the air gap. A visual inspection is normally a good indication.

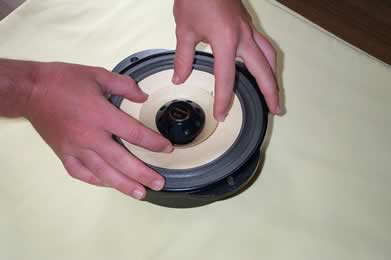
Next, using the forefinger and thumb, press evenly on the whizzer cone. You should be able to push the cone down by at least 2 mm without any rubbing noise. If this works OK and this is a new driver, you can happily install, grab a beer and start listening (not too loud for first 30 hours).
OK, things didn't quite work out or you need to replace the cone anyway.
Depending on your drivers, there are either 3 or 4 bolts to remove. These bolts are visible in between the magnet and the back of the support frame. Getting these bolts out of the support frame is tricky but easy nonetheless. Once out, The 1st step is to ensure that the coil is round.
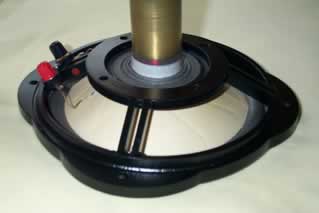
Insert the mandrel (the pipe) and carefully observe the gaps. If the coil is out of round, gently press on the opposite sides to rectify. This operation is time consuming, so patience is of the essence.

Next, check the magnet for foreign matter. The magnets are very powerful and can "pull" materials like iron filings from seemingly impossible distances.
Closely observe the air gap for particles, a flash light shining into the cap helps a lot.
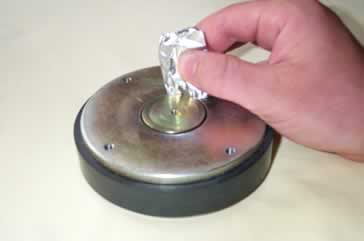
When you see small particles then it is time to put the Venture tape to work. Cut off a 8 cm piece and peel off the paper. Reverse fold the strip so that the sticky side is on the outside.
The strip can be inserted into the air gap and moved around until the air gap is visually free of any particles.

Now, re-install the cone onto the magnet. You should be able to "see" the coil from the top (except for the AER MD2 and AER MD3 drivers which have the coil deeply under-hung and are therefore deeper inside the magnet gap). With new replacement diaphragm assemblies you will receive the proper number of needed paper gasket(s). Once again, take care inserting the bolts.
Once the bolts are in place, do not fully tighten but observe whether the former is sitting square inside the magnet. At this stage you can still move the cone frame within the magnet to align the former. Once this looks OK, tighten the bolts a little bit more making it possible to move the frame with a slight tap (using a small plastic hammer) to one side is OK.
Next, place the drivers onto a table and connect to your test system. Using a test CD or frequency generator play a 20 Hz tone. Increase the volume such that the cone moves by about 3-5 mm.
At this stage you should hear nothing, so, beware, so you can easily overdrive the unit. If, on the other hand you hear a chuffing or scratching noise your cones need to be aligned better, gently tap one of the sides of the frame to move it until you don't hear noise.
If you have found a spot where the coil isn't rubbing then you can tighten the bolts completely. Check after tightening if all is still OK. If you can't find a "silent" spot then, return to step 1 and make sure that your coil is truly round and that there is no foreign matter inside the magnet gap.
Be careful, good luck and be patient if it doesn't work out too easy!